rutuja.tilekar
Last updated: 21 January 2026
In this article, you will find:
A step-by-step guide for configuring your Amazon Web Services (AWS) environment, and integrating it with the OneClickComply platform.
In order to establish a connection between the OneClickComply platform and your AWS environment, we require the use of an IAM (Identity and Access Management) user with read-only permissions, which you can either create manually, or through the use of CLI commands.
This support article has been created to guide you through the process of setting up the IAM user, and integrating your AWS environment with the OneClickComply platform.
Note: Please ensure you follow the instructions provided in this guide carefully, as configuring your AWS environment incorrectly will result in an unsuccessful integration.
Important: There are multiple IAM User areas within AWS. Please ensure you follow the guide below carefully, otherwise you may configure your AWS account incorrectly, delaying integration.
From your AWS dashboard, type 'IAM' into the search.
Select Users from the Access Management dropdown on the left-hand side.
From here, please select Create User. (You may use a pre-existing account for this process, however we would recommend creating a new IAM user to make tracking and troubleshooting easier).
Add a memorable name for this account. We suggest something such as 'OneClickComply-AWS-Connection'.
Once named, click the Next button to move to the Permissions page. (If you chose to use a pre-existing IAM user, go to the account, click the Permissions tab, then Add Permissions, and then Add Permissions again).
Select Attach policies directly.
Change the 'Filter by Type' to AWS managed - job function.
Type 'Read' into the search box and tick ReadOnlyAccess.
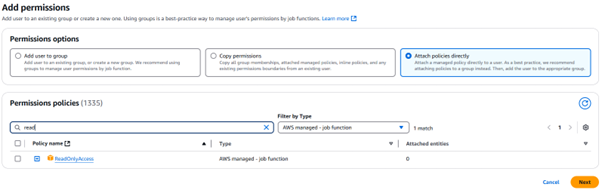
Add permissions - ReadOnlyAccess policy
Next, search for Security, and tick SecurityAudit.
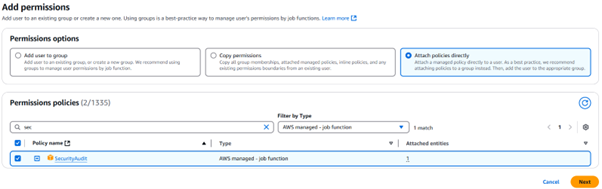
Add permissions - SecurityAudit policy
Click Next.
Once on the Review and create screen, please ensure that you have selected the correct permissions before continuing.
Select Create User.
Once the user has been successfully created (or you have assigned the correct permissions to the pre-existing account), select the user again.
Back on the user screen, click the Add Permissions dropdown (located within the Permissions tab in the middle of the page) and select Create Inline Policy.
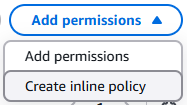
Add permissions dropdown showing the create inline policy option in AWS
Click the JSON button within the Policy Editor area.
Delete the current contents of the JSON editor, and paste in the content below.
Note - Please ensure that the formatting is also carried over. Incorrect formatting may lead to permissions being applied incorrectly.
{
  "Version": "2012-10-17",
  "Statement": [
    {
      "Action": [
        "account:Get*",
        "appstream:Describe*",
        "appstream:List*",
        "backup:List*",
        "backup:Get*",
        "bedrock:List*",
        "bedrock:Get*",
        "cloudtrail:GetInsightSelectors",
        "codeartifact:List*",
        "codebuild:BatchGet*",
        "codebuild:ListReportGroups",
        "cognito-idp:GetUserPoolMfaConfig",
        "dlm:Get*",
        "drs:Describe*",
        "ds:Get*",
        "ds:Describe*",
        "ds:List*",
        "dynamodb:GetResourcePolicy",
        "ec2:GetEbsEncryptionByDefault",
        "ec2:GetSnapshotBlockPublicAccessState",
        "ec2:GetInstanceMetadataDefaults",
        "ecr:Describe*",
        "ecr:GetRegistryScanningConfiguration",
        "elasticfilesystem:DescribeBackupPolicy",
        "glue:GetConnections",
        "glue:GetSecurityConfiguration*",
        "glue:SearchTables",
        "glue:GetMLTransforms",
        "lambda:GetFunction*",
        "logs:FilterLogEvents",
        "lightsail:GetRelationalDatabases",
        "macie2:GetMacieSession",
        "macie2:GetAutomatedDiscoveryConfiguration",
        "s3:GetAccountPublicAccessBlock",
        "shield:DescribeProtection",
        "shield:GetSubscriptionState",
        "securityhub:BatchImportFindings",
        "securityhub:GetFindings",
        "servicecatalog:Describe*",
        "servicecatalog:List*",
        "ssm:GetDocument",
        "ssm-incidents:List*",
        "states:ListTagsForResource",
        "support:Describe*",
        "tag:GetTagKeys",
        "wellarchitected:List*"
      ],
      "Resource": "*",
      "Effect": "Allow",
      "Sid": "AllowMoreReadOnly"
    },
    {
      "Effect": "Allow",
      "Action": [
        "apigateway:GET"
      ],
      "Resource": [
        "arn:*:apigateway:*::/restapis/*",
        "arn:*:apigateway:*::/apis/*"
      ],
      "Sid": "AllowAPIGatewayReadOnly"
    }
  ]
}
Click Next.
Now assign a name to this new policy. In the example below we have used the name OneClickComply-ReadOnly. We highly recommend using this name for the policy, as following your own naming convention may cause confusion should any troubleshooting or support be required.
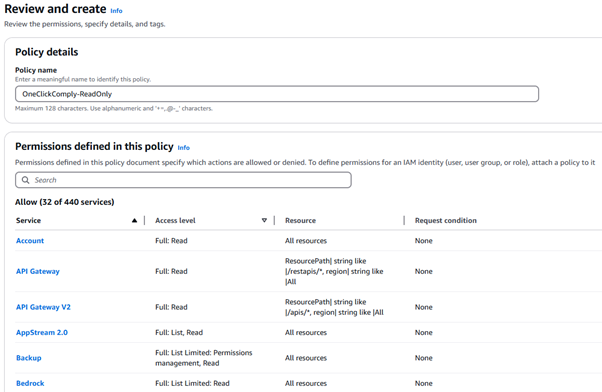
A screenshot of the policy details area of AWS
Scroll down the page and select Create Policy.
Your IAM user should now look like the following:
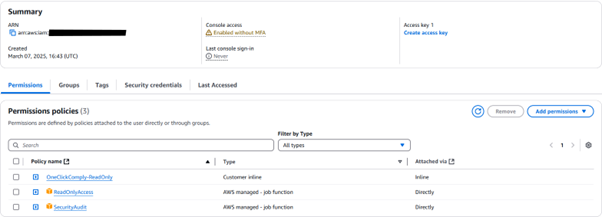
IAM user showing the assigned permissions
Once you have created the necessary IAM user with the required permissions, re-open the user and navigate to the Access Keys section.
This new account should not have any existing access keys associated with it. Select Create access key button, the choose the option for Third-party service.
Click Next.
(Optional) Assign a short description for this access key. It can even be as simple as 'OneClickComply Access Key'.
Click Create Access Key
Note - Please keep the Retrieve Access Keys page open, as you will need both your Access Key ID and Secret Access Key for the integration process.
If you would prefer a more automated process, we have provided a series of CLI commands that you can paste into your AWS terminal to create the IAM user, and assign the necessary permissions.
Note: We recommend keeping the user and policy names exactly as listed in the commands below. Changing them to fit your own naming conventions may make potential troubleshooting and support more difficult later on.
Creating the IAM user
aws iam create-user \
  --user-name "OneClickComply-AWS-Connection"
Attach AWS managed policies 'ReadOnly' and 'SecurityAudit'
aws iam attach-user-policy \
  --user-name "OneClickComply-AWS-Connection" \
  --policy-arn "arn:aws:iam::aws:policy/ReadOnlyAccess"
aws iam attach-user-policy \
--user-name "OneClickComply-AWS-Connection" \
--policy-arn "arn:aws:iam::aws:policy/SecurityAudit"Creating the necessary inline policy
cat > oneclickcomply-inline-policy.json << 'EOF'
{
  "Version": "2012-10-17",
  "Statement": [
    {
      "Action": [
        "account:Get*",
        "appstream:Describe*",
        "appstream:List*",
        "backup:List*",
        "backup:Get*",
        "bedrock:List*",
        "bedrock:Get*",
        "cloudtrail:GetInsightSelectors",
        "codeartifact:List*",
        "codebuild:BatchGet*",
        "codebuild:ListReportGroups",
        "cognito-idp:GetUserPoolMfaConfig",
        "dlm:Get*",
        "drs:Describe*",
        "ds:Get*",
        "ds:Describe*",
        "ds:List*",
        "dynamodb:GetResourcePolicy",
        "ec2:GetEbsEncryptionByDefault",
        "ec2:GetSnapshotBlockPublicAccessState",
        "ec2:GetInstanceMetadataDefaults",
        "ecr:Describe*",
        "ecr:GetRegistryScanningConfiguration",
        "elasticfilesystem:DescribeBackupPolicy",
        "glue:GetConnections",
        "glue:GetSecurityConfiguration*",
        "glue:SearchTables",
        "glue:GetMLTransforms",
        "lambda:GetFunction*",
        "logs:FilterLogEvents",
        "lightsail:GetRelationalDatabases",
        "macie2:GetMacieSession",
        "macie2:GetAutomatedDiscoveryConfiguration",
        "s3:GetAccountPublicAccessBlock",
        "shield:DescribeProtection",
        "shield:GetSubscriptionState",
        "securityhub:BatchImportFindings",
        "securityhub:GetFindings",
        "servicecatalog:Describe*",
        "servicecatalog:List*",
        "ssm:GetDocument",
        "ssm-incidents:List*",
        "states:ListTagsForResource",
        "support:Describe*",
        "tag:GetTagKeys",
        "wellarchitected:List*"
      ],
      "Resource": "*",
      "Effect": "Allow",
      "Sid": "AllowMoreReadOnly"
    },
    {
      "Effect": "Allow",
      "Action": [
        "apigateway:GET"
      ],
      "Resource": [
        "arn:*:apigateway:*::/restapis/*",
        "arn:*:apigateway:*::/apis/*"
      ],
      "Sid": "AllowAPIGatewayReadOnly"
    }
  ]
}
EOF
Attaching the JSON as an inline policy to the IAM user
aws iam put-user-policy \
  --user-name "OneClickComply-AWS-Connection" \
  --policy-name "OneClickComply-ReadOnly" \
  --policy-document file://oneclickcomply-inline-policy.json
Creating an access key for the IAM user
aws iam create-access-key \
  --user-name "OneClickComply-AWS-Connection"
This last command will print both an AccessKeyID and SecretAccessKey, which you will need to provide when connecting your AWS environment to the OneClickComply platform.
After you have successfully created the IAM user, assigned the correct permissions, and made a record of your AccessKeyID and SecretAccessKey, you may now connect your AWS environment to the OneClickComply platform.
Please follow the steps below to complete the integration process.
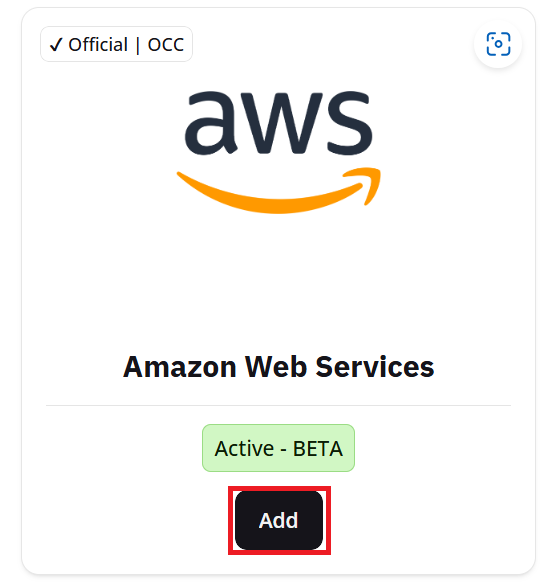
Open the OneClickComply platform and select the Integrations tab from the navigation bar on the left-hand side.
Click Add on the Amazon Web Services integration.
AWS integration guide
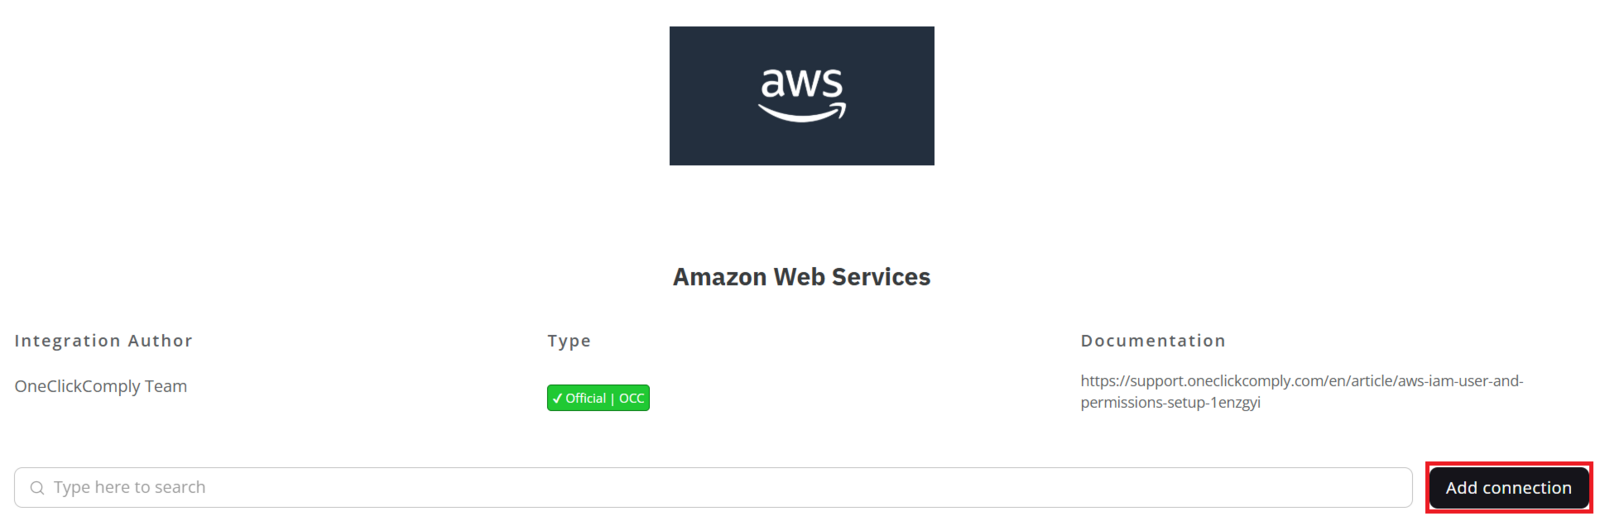
Once on this new screen, select Add Connection to begin connecting your AWS environment to the platform.
AWS integration screen showing the 'Add Connection' button
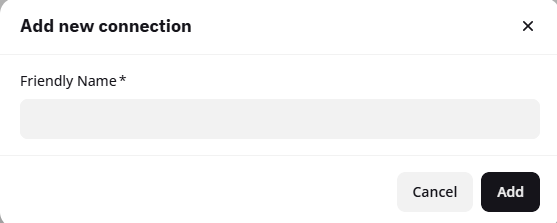
Type in a friendly name, one that you don't mind seeing in various locations on the platforms.
Adding a friendly name
Your new connection will appear in the table below the Add Connection button. Hover over the row containing your new connection, and click the '...' button located on the right-hand side of the table.

Completing setup for new integration
Click Complete Setup and follow the steps provided by the integration wizard, which will explain how to connect your AWS environment to the platform.
Note: You will need to copy your newly created Access key and Secret access key into their respective sections.
Once both keys are added, click the Submit button to finish the integration process.
Once all these steps are completed, the OneClickComply platform will have successfully paired with AWS, and you will see the following message:
.png?Expires=253402300799&Key-Pair-Id=K3I1KRL096EJY2&Signature=oOwB2C0Ta9G0IMrOHVBEzKvGn7QX0hfFAFzOKkAkA9nvBY~9tCeQw2D2o4xm2-eV84OVHvqiW4MVIi1XdVtG6IMlKTFXh7celFJH~uYmJXYQJfDOv4EU1EMwXF7rMpKUkvl4JWQd27yESdYqayqDGXujCU3gquYGJeYUnvMtbZVW688kiLa1qPT93ZnMgmU5h4ZACIKW4cJ3EhXrWi4hjTbNZ3z-8NinLceDToY02BwNWY63A6jG2Kj8Lb0T4KIWruVltmKfa5q2V9urSnufHz7l8SbguT4D9nZIEfzNYp-AHAUAdcOT1vk-hJPkwZR2pf5rpfB-lwsiw4YXVeP4bg__)
Successful integration message
The platform will then begin automatically scanning your environment for gaps and misconfigurations in-line with the standards you have access to as part of your subscription package.
If you have not enabled a standard at this point, navigate to the Standards area, located within the Compliance tab.
Edit the status of the standard(s) you wish to work towards, and set them to Active. This will cause any identified misconfigurations or gaps to appear within the Controls Management area.
To learn more about managing compliance standards and controls, please review our dedicated support articles.